


HOW
TO BRACE SOFT EARS
By There
are several ways to brace dogs’ ears. Please, speak to
your breeder before you start working with them, as they may
prefer a certain method of bracing them, or that you don’t
brace them at all. Please
be aware, if you brace the ears the wrong way, you may damage
the ear, instead of helping it to stand up. Be very careful
when applying anything to the ear, that the ear is clean, and
that you’re not creating wrinkles or creases in the ear.
Also, if the puppy has been putting his ears up himself, leave
them alone! They come up and fall down when they’re teething! If
you feel the puppy’s ears need help, first, I would try
shaving the ears, especially in plush puppies with lots of
fur. I would also try massaging the ears. On puppies whose
ears are very low stationed, I would brace right away. I would
also brace ears on puppies who haven’t even attempted
to put the ears up by the time they’re 4 months old.
But, that’s my recommendation, talk to your breeder! To
massage the ears, have puppy facing you, take your thumbs,
right thumb to puppy’s left ear, and left thumb to puppy’s
right ear. Run your thumb inside the ear, starting at the bottom
and running your thumb towards the tip of the ear. Don’t
do it hard! You don’t want to cause a lot of friction.
Don’t pull! It hurts! LOL You’re basically gently
ironing the creases and wrinkles out of your puppy’s
ears with your thumbs. Softly repeat this process. The idea
is to encourage circulation to the ears, and hopefully, get
them to stand by themselves!
One
way is to glue the ears together. Tear Mender or Skin Bond
can be used for this method. You are basically gluing each
ear together, over the dog’s head. Once glued, the dog
will look like he’s wearing a cone over his head. In
this method, you don’t shave the ears. Apply the glue
to the outside borders of each ear, and bring each border together,
holding the ears until the glue has dried. You’ll probably
need someone else to help you hold the dog still. You must
be very careful that there are no creases in the ears when
gluing them together! Also, that each ear is in the proper
position! I don’t like this method as much as using braces,
because I feel the chance of bending the ears the wrong way,
or creating creases is greater. You
can buy Tear Mender at fabric stores. You can buy Skin Bond
at drug stores, it’s the same product people use for
their ostomy bags, or order it from dog catalogs such as JB
Wholesale.
Moleskin
can be bought at grocery or drug stores. It’s found in
the foot section of the stores, and each package includes two
sheets of the moleskin. Don’t confuse it with molefoam,
which is much thicker, and will bend the ear if used. I will
talk about the uses of molefoam later on.
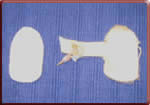
I
cut an oval piece of moleskin, without a tab. I then repeat
the process above, of peeling the backing, applying the glue,
and applying the piece to the ear. Usually, moleskin alone
is not strong enough to hold the ear up. So, I then take a
piece of molefoam, cut it ½ inch wide, and the length
of the moleskin, remove the backing, apply the glue, and glue
it centered in the middle, over the moleskin. This helps the
ear stand straight up, but isn’t too heavy to make it
fold forward.
I
started by gluing Orion’s ears together. I then moved
to the moleskin with tabs method. Eventually, one ear started
pulling the other. So, I started using the moleskin without
tabs, using the piece of molefoam to help brace the ear up.
This has worked the best for me so far! However, Orion’s
cartilage is very weak, and I don’t know if he’ll
ever have erect ears! But, I keep trying! Good luck! |

 First,
you must make sure the inside of the ears is clean. Use any
product that is safe for the dog, but that doesn’t leave
an oily residue. If there are no skin abrasions, I use alcohol,
as it dries quickly. But, there are other products, such as
witch hazel you can use. Then, you must shave or trim the hair
inside the ears, as it will get in the way of applying the
moleskin to the ear. Again, it would be safer if you had someone
assisting you in this process.
First,
you must make sure the inside of the ears is clean. Use any
product that is safe for the dog, but that doesn’t leave
an oily residue. If there are no skin abrasions, I use alcohol,
as it dries quickly. But, there are other products, such as
witch hazel you can use. Then, you must shave or trim the hair
inside the ears, as it will get in the way of applying the
moleskin to the ear. Again, it would be safer if you had someone
assisting you in this process.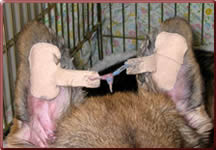 Using
the moleskin with tabs
Using
the moleskin with tabs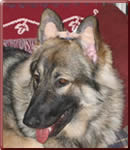 Sometimes
one of the dog’s ears is stronger than the other, and
it will pull one ear either towards the outside or towards
the middle. You can adjust how tight you tie the strings to
compensate for this. If the string stretches, you can also
take both tabs and staple them together. If neither of these
help, you can also take a piece of molefoam, cut it about ½ inch
in width and the length of the oval, remove the backing of
the piece you cut, apply Skin Bond to it, and glue it on top
of the moleskin. You can glue it to the outside part of the
moleskin, if that’s where the ear is bending, or center
it over the moleskin piece.
Sometimes
one of the dog’s ears is stronger than the other, and
it will pull one ear either towards the outside or towards
the middle. You can adjust how tight you tie the strings to
compensate for this. If the string stretches, you can also
take both tabs and staple them together. If neither of these
help, you can also take a piece of molefoam, cut it about ½ inch
in width and the length of the oval, remove the backing of
the piece you cut, apply Skin Bond to it, and glue it on top
of the moleskin. You can glue it to the outside part of the
moleskin, if that’s where the ear is bending, or center
it over the moleskin piece.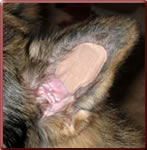 Using
the moleskin without tabs
Using
the moleskin without tabs A
word of warning. Some people like to use tampons or the left
over cardboard roll of toilet paper or of paper towels, cut
to size, and glue it inside the dog’s ears. These can
slide up, and weigh the ear down, eventually breaking the cartilage
of the ear. Once broken, the cartilage will not heal back,
and your dog will have a permanent broken ear that can only
be repaired by surgery, if at all.
A
word of warning. Some people like to use tampons or the left
over cardboard roll of toilet paper or of paper towels, cut
to size, and glue it inside the dog’s ears. These can
slide up, and weigh the ear down, eventually breaking the cartilage
of the ear. Once broken, the cartilage will not heal back,
and your dog will have a permanent broken ear that can only
be repaired by surgery, if at all.